Home>Garden Essentials>How To Germinate Murraya Paniculata
Garden Essentials
How To Germinate Murraya Paniculata
Modified: March 15, 2024
Looking to sprout your own Murraya Paniculata in the garden? Discover how to germinate this beautiful plant with our step-by-step guide.
(Many of the links in this article redirect to a specific reviewed product. Your purchase of these products through affiliate links helps to generate commission for Storables.com, at no extra cost. Learn more)
Introduction
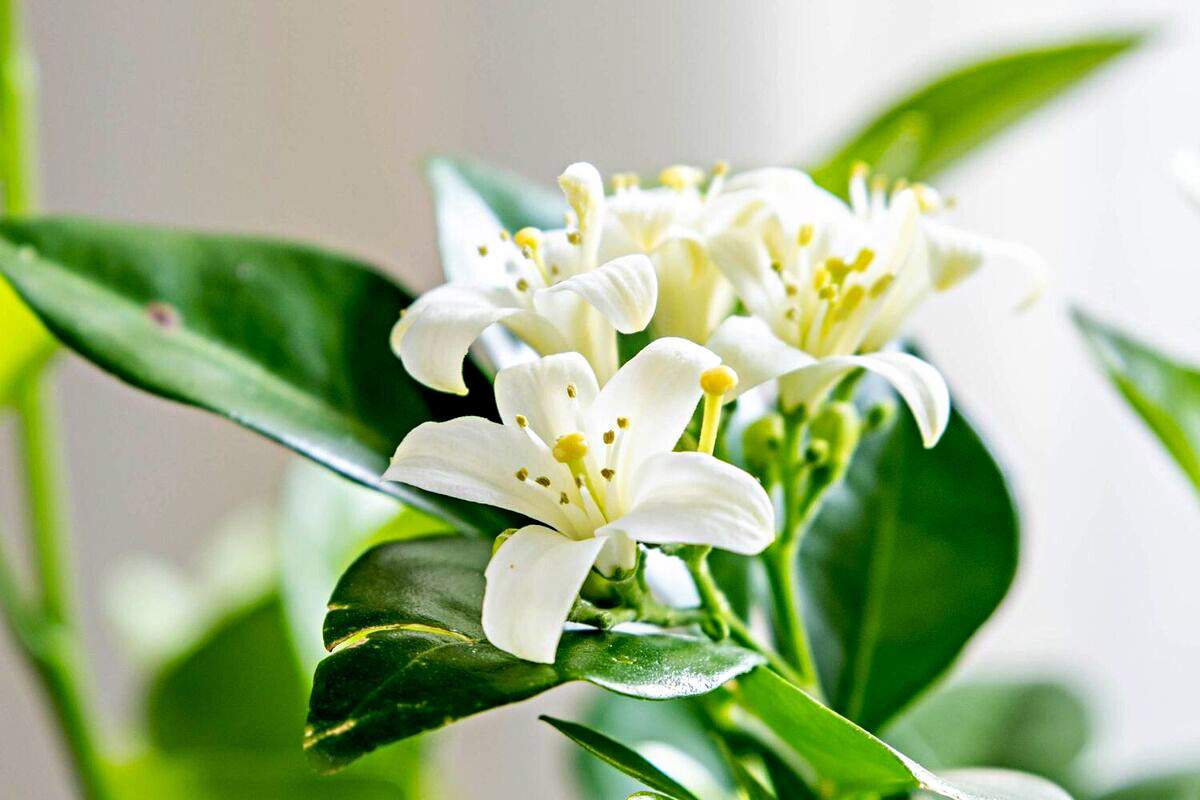
Welcome to our comprehensive guide on how to germinate Murraya paniculata, commonly known as the Orange Jessamine or Mock Orange. Murraya paniculata is a versatile and beautiful flowering plant that is commonly used as a hedge or ornamental shrub in gardens and landscapes. Its glossy green leaves, fragrant white flowers, and ability to tolerate a wide range of growing conditions make it a popular choice among gardeners.
If you’re interested in growing Murraya paniculata from seeds, you’ve come to the right place. In this guide, we’ll take you through a step-by-step process to successfully germinate these seeds and grow healthy seedlings. Whether you’re a beginner gardener or have some gardening experience, this guide will provide you with the knowledge and techniques necessary for successful seed germination.
Germinating Murraya paniculata from seed can be a rewarding and fulfilling experience. Not only will you have the satisfaction of growing plants from scratch, but you’ll also have the opportunity to witness the magical transformation from a tiny seed to a thriving seedling.
Before we dive into the details, it’s important to understand that germinating Murraya paniculata seeds requires time, patience, and careful attention to the specific needs of the plant. By following proper techniques and providing the ideal growing conditions, you can greatly increase your chances of successful germination and seedling development.
Throughout this guide, we’ll discuss the supplies you’ll need, the preparation of the seeds and growing medium, the process of sowing the seeds, providing optimal growing conditions, nurturing the germinated seeds, transplanting the seedlings, and caring for them as they grow.
So, let’s get started on this exciting journey of germinating Murraya paniculata seeds and watch as they transform into beautiful and vibrant plants that will enhance the beauty of your garden or landscape.
Key Takeaways:
- Growing Murraya paniculata from seeds requires patience, attention to detail, and proper care. By following the step-by-step process, you can significantly increase your chances of successful germination and the growth of healthy seedlings.
- Providing the right conditions, such as optimal temperature, light, watering, and nurturing, is crucial for the healthy development of Murraya paniculata seedlings. With proper care, you can enjoy the beauty and fragrance of these plants in your garden.
Read more: How To Germinate Pecans
Step 1: Gathering the Supplies
Before you begin the process of germinating Murraya paniculata seeds, it’s important to gather all the necessary supplies. Having everything ready beforehand will save you time and ensure a smooth germination process. Here’s a list of supplies you’ll need:
- Murraya paniculata seeds: You can source the seeds from a reputable nursery or purchase them online. Ensure that the seeds are fresh and viable to increase your chances of successful germination.
- Seed starting trays or pots: Choose containers that are clean, sterile, and have drainage holes at the bottom. Seed starting trays with individual cells are convenient, but regular pots can be used as well. Use shallow containers to allow for proper root development.
- Seed starting mix: Opt for a well-draining, sterile seed starting mix that is specifically formulated for germinating seeds. Avoid using regular garden soil, as it can contain diseases and pathogens that may hinder germination.
- Watering can or spray bottle: A watering can with a fine nozzle or a spray bottle will help you provide a gentle and even mist of water to the seeds.
- Transparent plastic wrap or a propagation dome: Covering the containers with plastic wrap or using a propagation dome will create a humid environment that promotes germination. Ensure that the cover is transparent to allow light to reach the seeds.
- Plant labels: It’s essential to label your seed containers to keep track of the different varieties or dates of sowing.
- Water source: Have a clean water source readily available for watering the seeds and seedlings.
- Grow lights or a sunny location: If you’re germinating the seeds indoors, provide adequate light using grow lights or place the containers in a south-facing window where they will receive at least six hours of direct sunlight.
- Thermometer: A thermometer will help you monitor the temperature of the growing environment and ensure it remains within the optimal range for seed germination.
- Optional: rooting hormone: Some gardeners choose to use rooting hormone to enhance the chances of successful germination. If you decide to use it, make sure to follow the instructions provided.
Now that you have all the necessary supplies, you’re ready to move on to the next step: preparing the seeds for germination. Ensuring that you have everything in place before you begin will help streamline the germination process and set you up for success in growing your Murraya paniculata seeds.
Step 2: Preparing the Seeds
Properly preparing the Murraya paniculata seeds before sowing them is crucial for successful germination. Follow these steps to ensure your seeds are ready for planting:
- Inspect the seeds: carefully examine the Murraya paniculata seeds for any signs of damage or disease. Discard any seeds that are discolored, shriveled, or have holes. Opt for seeds that are firm, healthy, and have a good shape.
- Scarification: In some cases, Murraya paniculata seeds may have a hard outer coating that can inhibit germination. To improve germination rates, scarify the seeds by gently rubbing them with sandpaper or nicking them with a small knife. This process will create small openings in the seed coat, allowing water to penetrate and stimulate germination.
- Soaking the seeds (optional): Soaking the scarified seeds overnight in warm water can help soften the seed coat and promote quicker germination. Fill a small container with room temperature water and place the seeds in it. Make sure the water covers the seeds completely. Allow them to soak for 12-24 hours.
- Stratification (optional): Some varieties of Murraya paniculata seeds may benefit from a period of cold stratification to break their dormancy and improve germination rates. To stratify the seeds, place them in a sealed plastic bag with a moistened paper towel and refrigerate them for 4-6 weeks. Check the moisture level periodically to prevent mold from forming on the seeds.
After preparing the seeds, they are now ready to be sown in the growing medium. Preparing the seeds properly increases their chances of germination and ensures that you start off with healthy seedlings. Proceed to the next step to learn how to prepare the ideal growing medium for your Murraya paniculata seeds.
Step 3: Preparing the Growing Medium
A well-prepared growing medium is essential for the successful germination of Murraya paniculata seeds. Follow these steps to create the ideal growing medium:
- Choose a seed starting mix: Select a high-quality seed starting mix that is lightweight, well-draining, and sterile. Avoid using regular garden soil, as it can be heavy and contain disease-causing organisms that may harm the seedlings.
- Moisten the seed starting mix: Place the seed starting mix in a clean container and moisten it with water. Gradually add water while stirring until the mix is uniformly damp but not soaking wet. Ensure that the mix retains moisture without becoming waterlogged.
- Fill the seed trays or pots: Fill the seed trays or pots with the moistened seed starting mix, leaving a 1/2-inch space from the top. Gently tamp down the mix to create a level surface.
- Sieve the mix (optional): If the seed starting mix is lumpy or contains large particles, you can sieve it to create a finer texture. This will ensure that the Murraya paniculata seeds make good contact with the growing medium.
- Label the containers: Using plant labels, mark each container with the date and the variety of Murraya paniculata seeds being sown. This will help you keep track of the different seeds and their progress.
By preparing the right growing medium, you provide your Murraya paniculata seeds with a favorable environment for germination. The lightweight, well-draining, and sterile seed starting mix promotes healthy root development and reduces the risk of diseases. With the growing medium ready, it’s time to move on to the next step: sowing the seeds.
Step 4: Sowing the Seeds
Now that you have prepared the growing medium, it’s time to sow your Murraya paniculata seeds. Follow these steps for successful seed sowing:
- Select the sowing method: There are a few different sowing methods you can choose from. You can either broadcast the seeds across the surface of the growing medium, or you can sow them individually in separate cells or pots.
- Sow the seeds: If you’re using the broadcast method, sprinkle the Murraya paniculata seeds evenly across the surface of the moistened growing medium. If you’re using individual cells or pots, make a small indentation in each cell or pot and place one seed in each indentation.
- Cover the seeds: Gently cover the seeds with a thin layer of the moistened seed starting mix or vermiculite. The layer of cover should be approximately 1/4 inch thick.
- Mist the surface: Use a spray bottle or a watering can with a fine nozzle to mist the surface of the growing medium. This will ensure that the seeds and the cover layer are moistened without disturbing them.
- Place a transparent cover: To create a humid environment that promotes germination, cover the containers with transparent plastic wrap or use a propagation dome. This cover will help retain moisture and warmth.
- Provide proper ventilation: While it’s important to maintain a humid environment, it’s equally important to provide proper ventilation to prevent the growth of mold and fungus. Lift the cover slightly or poke a few small holes in it for air circulation.
Remember to label each container with the date and variety of the seeds you’ve sown. This will help you keep track of their progress as they germinate and grow. Now that the seeds are sown, it’s time to move on to the next step: providing optimal growing conditions for germination.
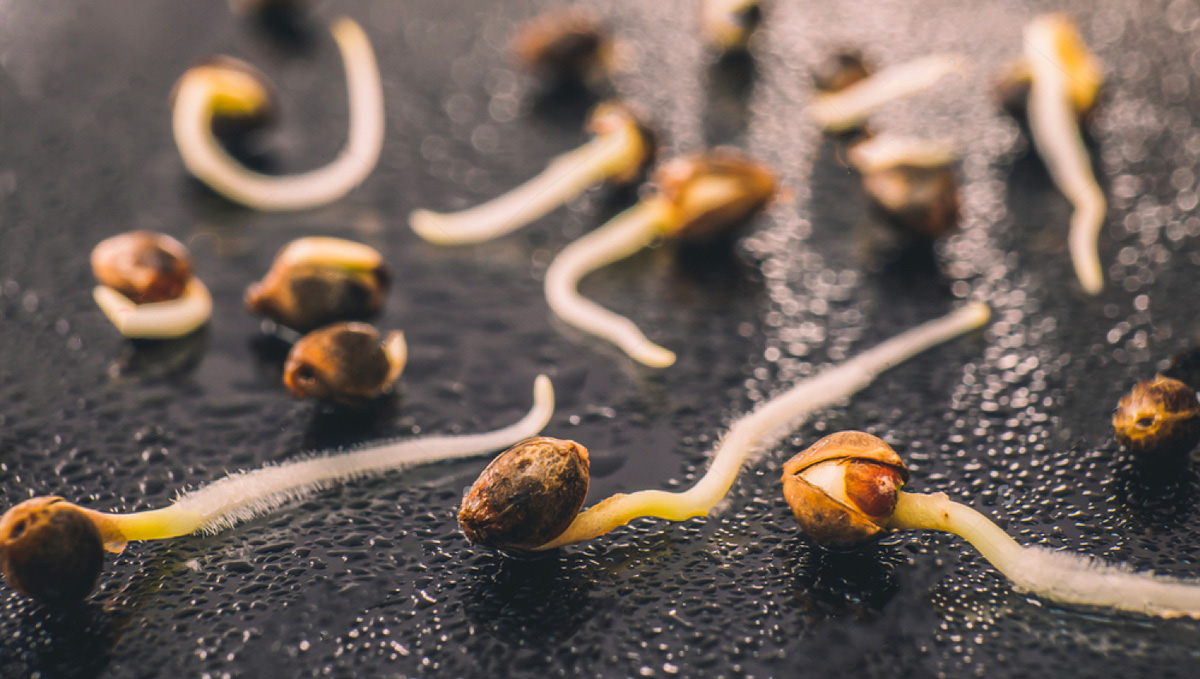
To germinate Murraya paniculata seeds, soak them in warm water for 24 hours, then plant them in well-draining soil and keep them consistently moist in a warm, sunny location. Germination can take 2-6 weeks.
Read more: How To Germinate A Pinecone
Step 5: Providing Optimal Growing Conditions
Creating the right growing conditions is crucial for the successful germination of Murraya paniculata seeds. Follow these steps to provide the ideal environment for your seeds:
- Temperature: Murraya paniculata seeds thrive in warm temperatures. Maintain a consistent temperature of around 75 to 85 degrees Fahrenheit (24 to 29 degrees Celsius). You can use a seedling heat mat to provide a steady source of bottom heat if necessary.
- Light: While Murraya paniculata seeds don’t require intense light for germination, they do benefit from some exposure to light. Place the containers in a bright location, but avoid direct sunlight, as it can overheat the seeds.
- Watering: Keep the growing medium consistently moist during the germination process. Use a spray bottle or a watering can with a fine nozzle to mist the surface of the growing medium whenever it begins to dry out. Avoid overwatering, as it can lead to damping-off disease and root rot.
- Humidity: The transparent cover you placed over the containers helps create a humid environment. However, if you notice excessive condensation, remove the cover temporarily to allow for some air circulation. Monitor the humidity levels and adjust as needed to prevent fungal growth.
- Patience: Germination of Murraya paniculata seeds can take anywhere from 2 to 6 weeks, so it’s important to be patient. Avoid disturbing the containers during this period to allow the seeds to germinate undisturbed.
By providing the optimal growing conditions of temperature, light, watering, humidity, and patience, you are creating an environment that encourages the Murraya paniculata seeds to germinate and develop into healthy seedlings. Now that your seeds are germinating, it’s time to move on to the next step: nurturing the germinated seeds.
Step 6: Nurturing the Germinated Seeds
Once the Murraya paniculata seeds have germinated, it’s time to shift your focus to nurturing the growing seedlings. Follow these steps to ensure their healthy development:
- Remove the cover: Once the seeds have sprouted and the seedlings begin to emerge, remove the transparent cover to allow for better air circulation. This will prevent the risk of fungal diseases and encourage stronger growth.
- Provide adequate light: Place the containers in a location that receives bright, indirect light or under grow lights. Ensure that the seedlings receive at least 6 hours of light per day. Adjust the height of the lights as the seedlings grow to maintain the appropriate distance for optimal growth.
- Watering: Continue to keep the growing medium consistently moist. Water the seedlings from below by placing the containers in a tray filled with water. Allow the seedlings to absorb the water through the drainage holes at the bottom. Once the top of the growing medium feels slightly dry, empty any excess water from the tray.
- Thin out overcrowded seedlings: If multiple seeds germinate in the same cell or pot, thin out the weaker seedlings to avoid overcompetition for resources. Gently remove the excess seedlings by carefully lifting them from the growing medium, taking care not to disturb the remaining seedlings.
- Fertilization (optional): After the seedlings have developed their first set of true leaves, you can start fertilizing them with a diluted, balanced liquid fertilizer. Follow the instructions on the fertilizer label for proper dilution and frequency of application.
- Monitor for pests and diseases: Regularly inspect the seedlings for any signs of pests or diseases. If you notice any issues, take appropriate measures to control or eliminate the problem. For organic options, try using insecticidal soap or neem oil spray.
- Transplant into individual pots: Once the seedlings have developed a few sets of true leaves and have grown to a manageable size, they can be transplanted into individual pots with a well-draining potting mix. This will provide them with more space to grow their roots.
By nurturing the germinated Murraya paniculata seedlings with proper light, watering, thinning, and optional fertilization, you are ensuring their healthy development and future growth. Keep a close eye on their progress as they continue to thrive. In the next step, we will discuss transplanting the seedlings into their permanent location.
Step 7: Transplanting the Seedlings
As the Murraya paniculata seedlings grow and develop, they will eventually outgrow their initial containers and need to be transplanted into their permanent location. Follow these steps for successful transplanting:
- Choose the right time: Transplant your Murraya paniculata seedlings when they have grown 6-8 inches tall and have developed a sturdy root system. This usually takes several weeks after germination.
- Prepare the planting hole: Dig a hole in the soil that is slightly larger and deeper than the root ball of the seedling. Ensure that the hole is located in a well-draining area and is dug in an appropriate spot for the mature size of the Murraya paniculata plant.
- Remove the seedlings: Carefully remove the seedlings from their containers, gently loosening the root ball if necessary. Be cautious not to damage the delicate roots.
- Plant the seedlings: Place each seedling in its respective planting hole, ensuring that the top of the root ball is level with the surrounding soil surface. Backfill the hole with soil, gently firming it around the base of the seedling.
- Water thoroughly: After planting, give the seedlings a deep watering to help settle the soil and eliminate any air pockets around the roots. Ensure that the soil is evenly moist but not waterlogged.
- Provide support (if needed): If the Murraya paniculata seedlings are tall or weak, consider providing support in the form of stakes or plant supports to prevent damage from wind or other elements.
- Mulch the area: Apply a layer of organic mulch around the base of the seedlings, leaving a small gap around the stem to prevent moisture-related issues. This will help conserve moisture, suppress weed growth, and regulate soil temperature.
Transplanting Murraya paniculata seedlings into their permanent location is an important step in their growth journey. Take care to provide the right conditions and techniques to minimize stress on the young plants. After transplanting, move on to the final step: caring for the seedlings as they continue to grow and mature.
Step 8: Caring for the Seedlings
Now that you have successfully transplanted the Murraya paniculata seedlings into their permanent location, it’s important to provide ongoing care to ensure their healthy growth and development. Follow these steps to care for your seedlings:
- Watering: Water the seedlings regularly to keep the soil evenly moist but not waterlogged. Ensure that the soil doesn’t dry out completely between waterings, especially during hot and dry periods.
- Fertilization: Feed your Murraya paniculata seedlings with a balanced liquid fertilizer every 4-6 weeks during the growing season. Follow the instructions on the fertilizer package for proper dilution and application rates.
- Pruning: As the seedlings continue to grow, periodically prune them to shape and promote bushier growth. Remove any dead, damaged, or unruly branches to maintain a tidy appearance.
- Protection: Protect the young seedlings from extreme weather conditions, such as strong winds or frost. Consider using temporary windbreaks or providing cover during cold snaps to prevent damage.
- Weed control: Regularly weed the area around the seedlings to prevent competition for nutrients and water. Use mulch to help suppress weed growth and conserve moisture in the soil.
- Monitor for pests and diseases: Keep an eye out for any signs of pests or diseases on the seedlings. Common pests include aphids, mealybugs, and scales. If detected, take appropriate measures to control the infestation using organic pest control methods.
- Support: As the Murraya paniculata plants grow taller, provide support in the form of stakes or trellises to help them maintain an upright position and prevent breakage.
- Regular maintenance: Throughout the growing season, continue to monitor and maintain the health of the seedlings. Remove any spent flowers or damaged foliage, and prune as needed to maintain the desired shape and size.
Caring for your Murraya paniculata seedlings is crucial to their long-term success. Providing regular watering, fertilization, pruning, and protection from pests and diseases will help them thrive and mature into beautiful and healthy plants. With proper care and attention, you’ll be rewarded with a stunning display of glossy foliage and fragrant flowers.
By following all of these steps, from germinating the seeds to caring for the seedlings, you’ll have the satisfaction of growing Murraya paniculata from scratch and creating a beautiful addition to your garden or landscape. Enjoy the process and the joy of watching your seedlings grow into mature, flourishing plants.
Read more: How To Germinate A Bean
Conclusion
Congratulations! You have now come to the end of our comprehensive guide on how to germinate Murraya paniculata seeds and care for the seedlings. Growing this beautiful and versatile plant from scratch can be a rewarding experience that brings beauty and fragrance to your garden or landscape.
Throughout this guide, we have walked you through the step-by-step process of gathering the necessary supplies, preparing the seeds, creating the right growing medium, sowing the seeds, providing optimal growing conditions, nurturing the germinated seeds, transplanting the seedlings, and caring for them as they grow.
Keep in mind that germinating Murraya paniculata seeds requires time, patience, and attention to detail. By following these techniques, you have significantly increased your chances of successful germination and the growth of healthy seedlings.
Remember to provide the seedlings with adequate sunlight, moisture, and nutrients. Regularly monitor them for signs of pests or diseases and take appropriate measures to address any issues that may arise. As the seedlings grow and mature, continue to provide them with proper care, including watering, fertilization, pruning, and protection from harsh weather conditions.
Watching your Murraya paniculata seedlings transform into mature, vibrant plants will be a source of pride and satisfaction. The glossy leaves and fragrant flowers will enhance the beauty of your garden and attract butterflies and other pollinators.
Thank you for joining us on this gardening journey. We hope that this guide has provided you with the knowledge and confidence to successfully germinate Murraya paniculata seeds and nurture them into thriving plants. Enjoy the process, and may your garden be filled with the beauty and fragrance of Murraya paniculata for years to come!
Frequently Asked Questions about How To Germinate Murraya Paniculata
Was this page helpful?
At Storables.com, we guarantee accurate and reliable information. Our content, validated by Expert Board Contributors, is crafted following stringent Editorial Policies. We're committed to providing you with well-researched, expert-backed insights for all your informational needs.


0 thoughts on “How To Germinate Murraya Paniculata”